Good Morning!
You have to love techniques that are simple to do yet give you a lot of bang for your buck. This is one of those. I love using distress inks especially with their reactions with water. You can do so many fun things with them.
It's been awhile since I've used this technique, but when I saw Jennifer McGuire's blog yesterday I knew I wanted to pull out my stencils and play...so I did.
Here's my take on it.

If you haven't played with distress inks you are missing out! There are a million tutorials and videos out there showing how they work. They blend so beautifully. Here are three colors blended together for an ombre look.

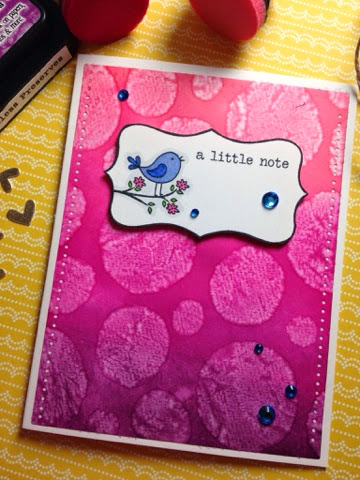
For my first card I chose this BIG dot stencil from Simon Says Stamp. I love it and haven't played with it yet. Just lay it over the top of your card add painter's tape or wash tape to hold it in place.

Wet a paper towel. Make sure you wring it out really well so it doesn't leak under your stencil. You want it damp but not really wet. Lay it over the top of your stencil and press into the negative space.

Wa la! Doesn't it look cool? I never get tired of seeing how it reacts with water. I used my heat tool to try it. I also laid a book on it to flatten out any warping from the water treatment.

Here is another look at the finished card. I cut out the dot background using one of my new favorite Avery Elle dies. I saved the frame for the second card. I love the look of the dots running along the edge. The bird stamp is from Hero Arts.
Below is a collage of the other card. Notice that because of the details on this stencil, I dabbed the paper towel into the corners rather than laying it over the entire stencil. This allowed a more precise reaction.

I finished up the card with some vellum, using the new Avery Elle stencil set once again. I heat embossed the greeting in Liquid Platinum and scattered some matching hearts around the card. Again, notice the frame from cutting out the first card is glued around the edge of this card but I turned it upside down to alternate the color pattern.

Hope everyone is having a great summer.
Happy Stamping!!


Thank you for the inspiration. Lovely effect:)
ReplyDelete(sorry, I leave my message as a comment because I didn't find contact form on your blog, hoping you'll see it soon.
ReplyDeletePlease answer directly to my email address elise.amann(at)wanadoo.fr).
Hello !
I'm writting an article for the issue 53 of the french magazine called "Passion cartes créatives".
The subject is nautical theme (sea, boats, ropes...).
I wish to show your beautiful card within this article.
(seen here : http://papercraftingsunshine.blogspot.com/2013/06/play-time-with-all-things-nauticool.html)
Would you agree with that ?
(if you have other cards you want to share with our readers, they would be welcome !)
If yes, could you please send me as soon as possible a high resolution photo of your creation (without watermark on it) ?
Of course, your name or pen name if you want will appear next to the image, and the address of your blog will be in the address book.
Thank you in advance for your quick answer, even if it is negative, so that I can get organized (I have to give my paper very soon).
Best Regards,
Elise AMANN